Master rapid prototyping with the right resolution.
Most teams build the wrong prototype first.
They chase pretty renderings or fully machined parts that impress in a slide deck, then discover basic usability or manufacturability issues when it’s expensive to fix. In a world of budget freezes and jumpy supply chains, that’s a bad way to spend money.
The teams who ship reliably do something different: they match the resolution of the prototype to the question they’re trying to answer.
Resolution is just fidelity: how close your build is to the final product in look, materials, and behavior. High‑res costs more and takes longer. Low‑res is faster and cheaper but lacks detail.
Chad is a professional engineer and has spent over 25 years leading complex engineering projects in medical device development and defense systems. He's been hands-on from early-stage prototyping to full-scale manufacturing, giving him unique insights into the challenges of bringing devices to market. Chad is always thinking about how to improve the development process to help clients save on manufacturing costs without reducing quality.

What is a product development prototype?
I’m often asked how many rounds of prototypes we should plan to build or how expensive the prototyping phase will be.
Let’s start with how I define a “prototype”, and then we’ll talk about what the right questions should be.
Most people think of a prototype as the early version of the complete product. When we talk about Alpha Prototype, Beta Prototype, Gamma Prototype, that’s what we’re referring to. Firmware, mechanical, electrical, fit & finish. These “prototypes” answer the question of how all the components fit and work together, what customers think of them, and how they’ll get manufactured.
At Root3 Labs, we have a broader definition. A prototype is any version of subsystem, panel, mechanism, etc. that we’re building to answer a question. That’s a question or risk that we’re unsure about.
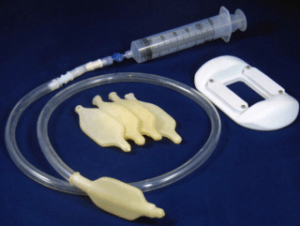
In a recent prototype, we weren’t sure whether an installer could get their hand in to a recessed cavity to screw in small antenna and cable connectors. Before cutting sheet metal and finding out the hard / expensive way, we built a prototype out of cardboard.

We already had the CAD models for this part, so in less than an hour, we had cut cardboard pieces on our laser and hot-glued it together to answer this question. If we’d waited until the sheet metal parts had been built and delivered, it would have cost thousands of dollars and weeks of time to rework the parts.
If you don’t have a laser cutter, a 1:1 printout and a razor blade can get you pretty close.
The goal isn’t “High-resolution or Low-resolution?”
“What’s the cheapest prototype that answers my next expensive question?”
Low‑Resolution: When It’s Still Cheap To Be Wrong
Early on, you’re not validating fillets and finishes. You’re answering:
-
How will it be used?
-
Who’s touching it, and in what environment?
-
What’s the basic geometry and interaction that actually works?
That’s where cardboard, foam, wood, and hacked‑together rigs shine.
One client needed to place a display and controls in a tight space. We held the display in place with magnets in a cardboard mock‑up, moved it around in front of real users, and figured out heights, angles, and clearances in an afternoon.

Fast, ugly, decisive.
Use low‑res when:
-
You’re still killing bad ideas, not polishing good ones.
-
You need feedback this week, not pretty photos.
-
You want to learn cheaply before production drawings and CNC get involved.
High‑Resolution: When Details Start Costing Real Money
Later, your questions change:
- Will this survive a drop, vibration, and cleaning cycles?
- Do these tolerances and stack‑ups actually work?
- Can manufacturing build 20, 50, 200 units the same way?
That’s when you move to machined parts, production‑intent materials, realistic enclosures, and full system behavior.
High‑res prototypes are for:
- Validating tricky mechanisms and tolerances.
- Getting realistic user feedback on look, feel, and ergonomics.
- Convincing stakeholders who need to see “the real thing” before they fund tooling.
They are not for “I’m still not sure where the handle should go.”
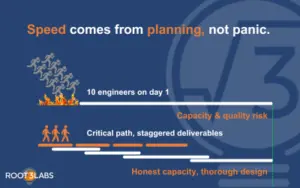
A Simple Rule For Rapid Prototyping
If you remember one thing from this:
Build the lowest‑resolution prototype that answers your next high‑stakes question.
Then step the resolution up only when the current level stops giving you new information.
That’s how you move fast and spend money like an adult instead of a gambler. In my world, that’s how you earn trust: give away the real decision framework, then offer help doing the hard parts.