Overcoming Manufacturing Complexities with Dip Molding
Fabricating complex shapes (quickly and at a large scale) is a common challenge in medical device design. Although injection molding reigns supreme in many cases, it’s not always feasible for devices with complex curvatures. At Root3 Labs, we ran into this challenge ourselves when a client needed their complex curved medical device redesigned for manufacturing.
Our solution? Dive into the world of dip molding, a lesser-known production method for medical device manufacturing. Keep reading to explore how it tackles complex geometries, and some pros and cons of working with dip molding.
How Does Dip Molding Work?
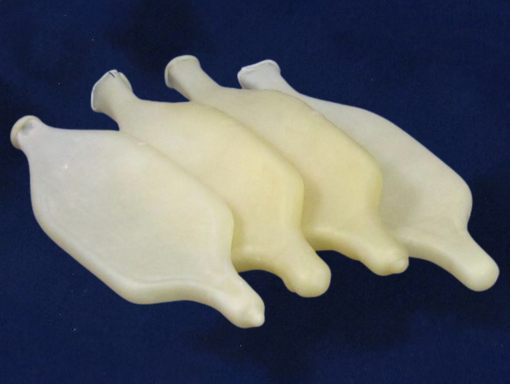
Dip molding is a manufacturing technique that creates plastic parts by dipping heated metal molds (mandrels) into a liquid polymer like liquid PVC, or latex. It’s commonly used for medical balloons, cannulas, and surgical gloves. (All complexly shaped items with curves!)
Let’s walk through the process step by step:
1. Designing and Manufacturing the Mandrels
- The first step involves designing and modeling the metal molds, known as mandrels.
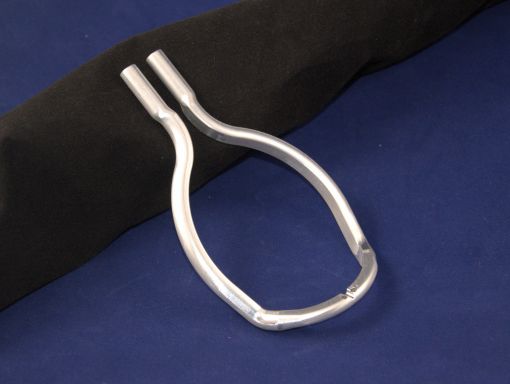
- Mandrel design is crucial. A large radii is needed to facilitate the de-molding process, and there should be enough extra space left at the top of the mandrel to allow for the manufacturer to grip the mandrel while dipping.
- After the design is complete, the mandrels are manufactured on a CNC machine from either aluminum or steel.
- For finishing, electropolishing is recommended since it facilitates the de-molding process by creating a smoother internal part cavity.
- When the mandrels are finished, they are sent to the dip molding facility.

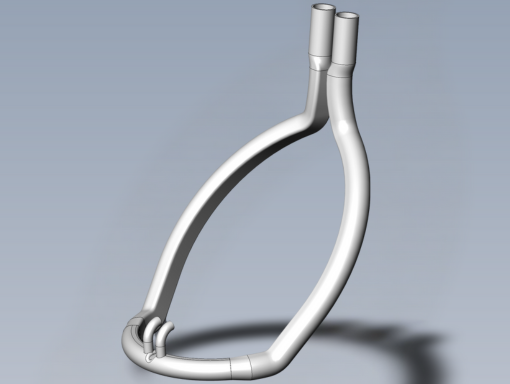
This is a CAD visual of a mandrel designed to produce cannulas.

2. Dipping and Curing
- At the dip molding plant, heated mandrels are dipped into the liquid polymer.
- The most commonly used polymer is liquid PVC or plastisol, with other options available like latex, polyurethanes, and silicones.
- Dipping can be done manually by hand or with a programmable, automated machine. Automation enables more precise control over things like orientation of the mandrel and speed of dipping. This results in more consistent, repeatable results.
- The final thickness of the product is determined by several factors like the initial mold temperature, polymer temperature, dipping speed, and dwell time (how long the mandrel stays submerged).
- After a set dwell time, the mandrels are placed in an oven to dry. The heat from the oven cross-links the polymer, curing it into a solid piece.
3. Demolding and Finishing
- Finally, the mandrels are left to cool, and then the finished parts are removed from the mandrels.
- The parts are now ready to use!
Finding this info helpful? Sign up for more!

Why Dip Molding for Medical Devices?
Dip molding offers several advantages over other techniques!
- Cost-Effective: Low tooling and production costs compared to injection molding.
- Rapid Prototyping: Quick turnaround time for prototype creation.
- Scalability: Works for small or large production runs.
- Design Freedom: Creates parts with complex shapes that injection molding struggles with.
- Material Versatility: A wide range of materials with varying durometers can be used.
- No Parting Lines: Finished parts have a seamless appearance.
What are the Limitations of Dip Molding?
Although it offers many advantages, dip molding does also have some limitations.
- Potential for Imperfections: Drip marks or bubbles are possible on some samples due to the nature of the process.
- Wall Thickness: It can be difficult to maintain consistency in the wall thickness of the parts.
- Mandrel Design Constraints: They need to be designed so that smaller cross-sectional areas that will be pulled over larger cross-sectional areas are at least half the size of the larger area. If the design of the device doesn’t allow for this, the mandrel may need to be manufactured in separate parts.
Dip Molding: A Valuable Tool in Your Device Design Arsenal
Despite some limitations, dip molding remains a valuable solution for specific scenarios. Its speed, cost-effectiveness, and ability to handle complex geometry make it a powerful tool for transforming ideas into high-quality medical devices.


