Making the Invisible Visible: A Clear Look at Next-Gen Mechanical Hands
Have you ever wanted to look inside of a mechanical pencil and see how it effortlessly grabs the lead and feeds it out with every plasticky click? Or maybe you’re fascinated by mechanical watches that have a clear enclosure allowing you to see the internal gear system. At Root3, we are obsessed with understanding how things work, and sometimes the best way to do this is to see what’s under the cover – literally. We tested clear cast molding against 3D print clear resin to see what would give the truest transparent result.
Root3 Labs has been helping Marins Med LLC develop a next generation, fully mechanical prosthetic hand. This new durable device was inspired by army research in the 1940’s. Many amputees prefer this cable actuated design to the new-age electronic prosthetic options. Marins Med’s ProHensor® device captures the functionality of the original army device but redesigns it to allow a quick swap of the consumable components while increasing its durability. This purely mechanical device contains a series of precision interactions that occur behind an opaque outer casing.
To showcase the internal working for analysis, marketing, and just because it’s cool, Root3 worked to fabricate a clear cover of the existing aluminum part to provide a window into the device.

The Quest for Clarity: 3D Print Clear Resin vs. Clear Casting
Although you’ll find clear parts everywhere from food storage containers to glass lenses, true material transparency is difficult to achieve. It requires a uniformly polished exterior so light can pass through with little to no diffraction. Otherwise, it’s considered only translucent, allowing only some light through instead of all – not truly transparent. For this design, we decided to explore two available material options in order to compare the results. First up was a 3D print in clear resin with a clear coat. Second was a clear cast mold. The first was significantly easier to fabricate, but the second provided a more transparent finish. Keep reading to see the testing process play out, and the final results!
“At Root3, we are obsessed with understanding how things work, and sometimes the best way to do this is to see what’s under the cover – literally.”
3D Print Clear Resin with a Clear Coat
3D printing the cover produced surprising results. There are “optically clear” resins we could have used, but they generally require some amount of post-processing to smooth the build lines and achieve true clarity. This could be in the form of sanding and polishing, vapor polishing, or clear coating.
Instead, we looked to Smooth-On for their brush on coating for 3D prints called “XTC-3D”. It smooths the surface of a 3D print, minimizing the need to excessively sand parts for a finished look. Two thin coats on an SLA part printed in a clear resin provided a smooth exterior that drastically improved the transparency of the print. Although not perfect, this provided a translucent cover with almost no labor in under 1 day!
Once installed, the limitations of the 3D printed cover became clear…because the cover was not. Although it looked cool and fit like a glove, the mechanism we were trying to showcase was just a shadow behind foggy glass. We went back to the drawing board and explored molding to unlock alternate clear materials.

After two coats of Smooth-On XTC-3D


The Power of Clear Cast Molding
Urethane casting provides a low-cost option for high quality parts in low volumes. To make the clear cast mold, our process involved casting a 3D print of the part to make a two-part mold and then filling that mold with a clear castable material. It seems straight forward, but the molding process is finicky and there are many nuances to pay attention to if we hope to achieve good results.
To start, we needed to make a mold. For the most part, the geometry necessary could be achieved with a simple two-part straight pull, but we did have to add a side action to resolve one perpendicular hole.
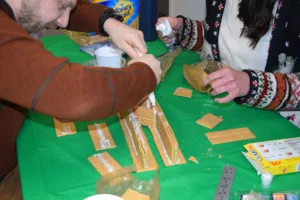
We started with a 3D print – a replica of our first clear print without the coating. To cast the first side of the part, we filled the opposing cavity with clay. This ensured the holes would be sealed to better control the flow of urethane. We built up a temporary enclosure with rectangles of acrylic and hot glue (super sophisticated, we know).

Next, we coated the walls and the piece with a silicone mold release. This step is critical – trust us, we’ve tried and miserably failed when this step was excluded. The urethane is a two-part system that is measured by volume and mixed. It’s recommended to stir the mixture in one cup, being sure to scrape the sides and then pour the mixture into a clean cup to continue stirring. This prevents unmixed parts along the walls from staying in the mixture.
During this process, it’s important to keep track of the time. The urethane has a cure time and a pot life. The pot life is the amount of time available to work with the material and get everything into its final resting position. From there, the urethane needs 16 hours to fully cure before being demolded. For Vytaflex 60, the cure time is 16 hours, but the pot life is sixty minutes. Sixty minutes is a relatively substantial pot life compared to some silicones we’ve worked with that can get down to a 5 or 10 minute pot life.
During the 60 minutes, we mixed the two parts, poured them into a large container, vacuum degassed the mixture, and then poured it into the mold. During degassing, the mixture grows to ten times its original volume, so using a large container prevents overflow. If the expanding mixture looks like a growing sludge monster as the bubbles boil to the surface, then you’ve done it right! This is called the “rise”. The mixture will reach a critical point and then rapidly “fall”. From here, you continue degassing for 1 minute and then release the vacuum. This is called the rise and fall method.

Once degassed, the urethane is ready to pour into the mold. To minimize air bubbles, we hold the cup high above the mold and target a thin stream into the lowest part of the mold. Then we just hold it there and slowly fill the mold from that point, letting it self-settle. From here, all we can do is wait. This is the longest part of any molding project, not just a clear cast mold. Some materials have additives that adjust the pot life and cure times, but it’s all a balance between moldability, timing, and material properties.
After 16 hours, we demolded the first half and checked the results. To make the second half of the mold, we flipped the cured mold and repeated the process – taking care to coat the whole thing in mold release again to prevent the layers fusing. Once the full mold cured, we drilled holes in the low points of both cavities to provide venting holes for the urethane to degas after pouring the mold.
Typically, a castable mold is flat on one side and the mold will leave that side open to the air providing a spot for the material to be poured. This geometry did not lend itself to a good pouring location, so we had to take a different approach. One side of the mold was more of a bowl and the other side of the mold was more of a mountain. To fill the mold, we poured the clear casting material into the bowl half of the mold and then pushed the mountain into the pool of resin. Using this process, the excess resin overflows out the sides of the mold. It’s a messy process, but the pressure helps push material out of the venting holes and shrink bubbles almost like a pressure cast.

For the clear cast mold, we used Smooth-On’s Crystal Clear series. This is an industrial grade clear resin that requires proper PPE and ventilation, not recommended for at-home use. For at-home clear casting, there are various clear epoxies that could work instead. To minimize air bubbles, Smooth-On recommends preheating the mold at 212°F / 100°C for 4 hours. Once this was complete, we treated the mold with mold release and then prepared the Crystal Clear series in the same way as we prepared the urethane by mixing and degassing before pouring. Once poured, pressed, and cleaned up, we secured the mold between two acrylic plates. This ensured a uniform pressure on the mold surfaces to prevent distortion while curing.

This material had a pot life of two hours and a cure time of 48 hours! Crystal Clear, like most two-part resins, likes to be molded and cured in a warm environment (73°F / 23°C). To achieve this, along with the ventilation requirements, we used our enclosed laser bed equipped with an activated carbon filtration system. We then heated a block of marble in the oven and placed it in this enclosed volume to subtly warm the space without supervision. After 48 hours, the mold required a post-bake before demolding – 6 hours at 150°F–160°F (65°C–72°C).
After 86 hours (between the cure time for both mold halves and the casting material), the part was finally demolded! The difference in quality was clear, but the added value compared to the time invested is debatable. 86 hours is a pretty long turn-around for just one part. Take a look at the difference – do you think the time was worth it?
The Results!

Written & Researched by: Christina Krueger, PE