A Pulse Oximeter in a Name Badge? The Badge Challenge: Part One
Picture this: a sleek, futuristic name badge that has a pulse oximeter, displays dynamic data, and connects you to your peers. That’s not science fiction – it’s the brainchild of Root3 Labs’ engineering team, and it came to life in just one month!
Our mission was to showcase Root3 Labs’ diverse engineering capabilities at the MEDICA Trade Fair, just four weeks away. While photo and video are always excellent avenues to show off our work, we wanted something people could hold in their hands. Something that would really help to spark curiosity and conversation.
Enter the “Smart Badge”! LEDs, interactive screens, pulse oximeter, sleep monitoring, Bluetooth capability…the brainstorming session exploded with big ideas. But with the deadline looming, we knew we would have to prioritize. We took everything we’d come up with and pared it down to our Minimum Viable Product (MVP): a fully finished name badge with an interactive screen, and the potential to evolve.
Our ‘nice-to-have’ features consisted of a functioning pulse oximeter. And lastly, we did have a ‘stretch’ goal of including Bluetooth connectivity. There was an idea to use one of our older projects (the Brainchild Smart Pacifier) that had app integration and connect its output to the Badge as a bonus feature. This would be very impressive, and of course, very time-consuming to pull off. Which is why it ended up in the stretch goal category!
You may think going from design to finished product in less than four weeks sounds daunting, but Christina Krueger, PE disagreed. “No, not daunting – at least, not for me. Ask Christopher, though. They actually knew how much electrical and software work it would be. They really knew how daunting it was!” She said she was more excited to have the opportunity to work with total creative freedom, letting her get to focus on what she loves – the engineering.

Design Considerations
Because we had so much freedom with how to design the Badge, we needed to keep our considerations and limitations top of mind to keep us on track. The four-week time constraint was the biggest factor to consider, and actually led to some of our other self-imposed restrictions. We would aim to minimize any ‘off-the-shelf’ components and source or fabricate as much as we possibly could in-house. This would eliminate lead times for ordered parts or outsourced work and keep us quick and agile throughout development.
Close collaboration was key for this project. The electrical and mechanical team were able to work in tandem to come up with our final design, with the form factor of the Badge having been built up around the requirements of the screen display and the critical thumb contact points.
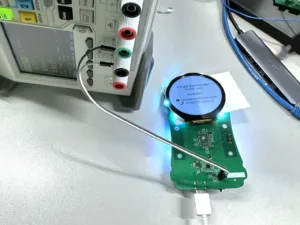
The thumb contact points would be used for the pulse oximeter feature, so it was critical that the sensor had a flush connection with the electronics within. Using a marker board, we were able to mess around with various thumb placements and layouts for the design to see what would feel comfortable in the hand. The Badge ended up similar in size and shape to a modern smartphone – essentially, a large rectangle shape.
That brings us to our final point of consideration – materials. While we considered urethane or injection molding for the enclosure, ultimately, we decided that it would be too time consuming. Thankfully, Root3 Labs’ fully equipped workshop has SLA 3D printing capability, which would serve fine for our two badges. But we kept our options open, designing the enclosure with future mass production in mind – ten badges for the entire team? Why not?


With the final design in place, the team sprung into action. Boards, our number one critical item, were ordered first. We expect about a one-week turnaround for bare boards, so it was imperative to get that order in right away. While we waited, our Mechanical team got to work laying out the board while the Electrical team started sourcing parts.
The plan for the next month was laid out in front of us! While we were waiting for the boards to arrive, we could work on printing prototypes of the case to test how everything fit together. Once the boards arrived, Electrical would work to populate them and start testing. Running parallel to Electrical, we would have the Mechanical and Fabrication team working to machine the thumb contacts and build up the enclosure. Once everything was assembled, we would move onto testing all of the various functions and working with the software elements. It was a tight schedule, but we had built-in backups – and a flexible plan ready to adapt if needed.