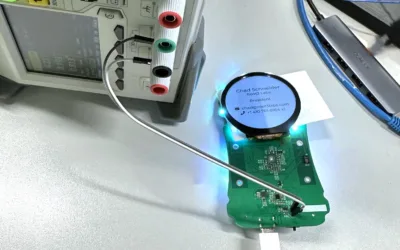
How do I create a new product?

Learn what it takes to turn ideas into prototypes and prototypes into finished products. When we talk to entrepreneurs or small-businesses exploring a new product development project, they share their concern about spending a lot of money and not getting the outcome they (or their customers) need, or their frustration at choosing which idea is worth the investment, or simply being overwhelmed and don’t know where to begin. If this sounds familiar, watch our panel discussion with industry experts that can help answer some of these issues. This is part of a series of videos from a Panel event hosted by Root3 Labs, so be sure to check out the whole Building A Business playlist on YouTube.

Topics Overview : The Product Development Process – turning a concept into a finished product

Chad Schneider , PE – Root3 Labs, http://root3labs.com Chad is a senior mechanical design engineer with over 20 years of engineering experience in the design of complex electromechanical prototypes and products for the medical device and defense industries. He is experienced with commercial as well as State and Federal Government clients, named on 9 patents, a licensed sUAV Commercial Pilot, a duly licensed professional engineer by the State of Maryland, and the founder of Root3 Labs.

Video Transcript

Page 1: Intro Page

So my name is Chad Schneider. I’m a mechanical engineer and entrepreneur. I founded Root3 Labs in 2012. The company is an engineering and product development company that helps businesses turn ideas into prototypes and prototypes into finished products. Today I’m going to talk about some of the process for developing a product, and let’s start with once you have an idea. So, Todd discussed some strategies for deciding if you have a good idea whether it’s worth spending the time, effort, and money to develop it further.

Page 2: Technical & Business Aspects

So each product idea has, or product, has two components. When I think about the technical aspects of a device, as well as the business aspects of the device, the technical components involve the details of how product or service works, functions, how big it is, how fast it is, how it works and performs. Then the business component is how you make a profit; sales, marketing, distribution… What is the business model for your product? How do you get it out there and form a business around it? So a lot of things to consider… Some are: How much does the solution solve or save consumers in time, money, or in detrimental outcomes? What are the annual sales volumes and the retail costs that you can command? That’s… Those are two questions that I think about when you’re considering whether to move ahead with a product and you understand what you can command as a retail price. So, that’s the top-down approach, what the market will bear. And then, how many sales you’ll get in a year? Then you can compare that with the bottom-up approach of how much it’ll take to manufacture it and figure out is it a viable option. Hopefully, the retail cost is a lot more than the manufacturing cost. Generally, you want it to be four to eight times what the manufacturing costs to include things like overhead R&D, amortization, distribution, service, warranty work, and growing your company.

Page 3: Product Design Specification

So, you start by building out your Product Specification. This lists all the different performance, functions, features, everything that’s going to go into your… into your product, and it defines how… who the customer is, how it will be used. These are all things that you want to have as a fact, something that can be tested, so it shouldn’t be… you shouldn’t have a product specification that says “it will do good things and be pretty”. They need to be things that you can test to. So, if it’s going to survive at 104°F or 40°C it’s got to… or if it’s going to be dropped from three feet, then that’s a test that you can perform at the end, of your, to validate your design meets those criteria. So, you’ll need to perform a lot of research to figure out what are the needs of your consumer, what goes into this product specification, what are the benchmarking of other products that you need to meet…

Page 4: Risk

Risk, it’s a small word with big implications. The entire product development process is… it has a lot of risk involved in it. We’ve got technical risk of trying to meet high performance goals while keeping low cost targets, safety risk of a Class 2 or 3 medical device. Maybe there are side effects or the efficacy studies that you have to do – What are the risks of a malfunction? The business risk of a changing marketplace, so you might have customers that change their mind, competition that pops up while you’re in the middle of R&D or a recession, and then there’s the regulatory risk of clearing the fda for a medical device. You might have other regulatory risks around wireless devices in the FCC. You might have a new medical device tax or insurance reimbursement. Then there’s the funding risk of getting enough money to develop your product as well as sustain any kind of things that might happen if the fda took longer to approve your product or clear your device. If some other unknown risk kind of gets in the way, how are you going to handle that? If you need to put more money or time into it? So I generally recommend to attack the risky components first so we can identify the risky components. We attack those first, get those out of the way because if we know that we can… you know… surround this technology with an enclosure or make it watertight or drop it from three feet, those things we know how to do. It’s the risky components inside the device or the science behind it or the technology behind it that you want to identify first. And that way, if you have to change your course midway, you haven’t gone all the way down making… you know… spending the engineering time of doing the effort of making it watertight or drop test or design for manufactured but you’ve solved all those risky issues. And if you have to change it because now it’s three times bigger or something has to change because it’s more expensive so you need to get the cost down some other way. Those are all good things to know before you spend your money on the more well-defined parts of the project.

Page 5: Technical & Business

So that’s not to say that all the risks can be identified up front or that the technical aspects of the project are the only risks involved. There’s also risk in the business components of the project. The business aspects of the business plan. So you might decide that you need to use this certain technology, and it’s the only way that you can get accurate enough data. That raises your price but now it might go back into your business plan, and now your retail price is too high or your manufacturing price is more than you can make it work at compared to the retail price that people are willing to pay. All these things are interconnected and you can’t limit your view to just the technical feasibility of the project. As engineers we’re always thinking about the technical part but… and inventors often do as well… but you also need to consider the business ramifications of how you’re going to make money.

Page 6: Concept Sketches

So when we’re starting out in the product development process, we’re starting out with the idea and now we’re trying to convey that idea to get feedback about it… to understand what the best way forward is. And so we start out with sketches, we start out with preliminary CAD models and understanding the use case scenarios. Very quickly and inexpensively we can start to think what is this potentially going to look like? How will it be used? Who’s going to be handling it? We can create all these concepts and this is just a view of a couple of refined illustrations of concepts, but we probably went through 10 original concepts. We’ve whittled those down to 3 primary concepts, and then we pick from there. We might pick a few aspects from Concept One and a few aspects from Concept Two and think about how that all fits together before we really start doing the detailed design. We’ll filter those concepts out and evaluate them against the criteria that we talked about in the Product Specification and make sure that those Concepts all meet the needs of the product itself. We’ll think through the various concepts to better understand the risks and figure out whether it’s technology integration or sensing or price point or something else that we really need to still figure out.

Page 7: Simple Mock-ups

When we have some of these risky aspects to the project… we’ve  put together some sketches, and now we’re thinking it might be nice to really have a model you can hold in your hand. You want to figure out if something feels right so maybe you could use modeling clay you could use foam. You could build something on a 3d printer but really thinking as simple as possible, you can cut cardboard up and mount it together. We’ve definitely done prototypes out of cardboard. We’ve done prototypes out of wood where you can modify it really easily. When you’re talking about a large piece of equipment, you might not know exactly how big you want it and it’s far easier to think about things in wood and foam and cardboard than it is to make something out of metal and then change it by half an inch. So we don’t want to jump to all the way to real fabrication techniques yet, if we can get away with something easier. In the cardboard prototype, we’re able to use magnets to hold a shelf in place and you can move it up an inch or out an inch and you don’t have to think about cutting metal or even cutting wood and remounting it. There’s a lot of different techniques you can use to move along cost effectively.

Page 8: Benchtop Prototype

The next step is building a benchtop prototype. These prototypes… you want to look at the Product Specification and figure out, “What are the real essential components for this product?” What are we really have to know about this? We don’t need it to be waterproof. We don’t need it to be dropped. We don’t need it to work at high temperature. These are the things that we’ll get to, but at this point we just need to figure out, “How does it work?” What does the technology look like? So we might use off-the-shelf components… We’ll use an Arduino, per se, and we’ll mount that with a motor and start to figure out how everything works together. We’re not going to get to custom parts so the size shape features and functionality will be limited as well as ruggedness. Handing that prototype off to someone else might be difficult because, really, if a wire comes out, the whole thing is sunk. So it might just be a way to evaluate an idea without going through that further effort to make it really look nice or be packaged up.

Page9: Software Mock-up

The other aspect is software. So you might have a mobile app that talks to a device over Bluetooth, or you might be integrating it with a PC or a Web application. You don’t need to go through the effort of building all of that functionality yet. It can take months to develop a fully fleshed out application. At this point, you might need the prototype to work, and then you can use images… you can use photoshop. Say, “Here are the five screens we’re going to use.” and we need them to look… you know… we can move things around this way… in that way… and see how it appears instead of going into code and taking a long time to really get that ironed out. We don’t need to involve the app store in that. We just share some graphics, change some colors, things of that nature.

Page 10: Works-Like, Looks-Like

Then we might have limitations on the off-the-shelf components that they don’t meet the size and scale and functionality. Or, rather they meet the size and scale, so we might have a combination of the Works-like, Looks-like prototypes. What I mean by that, is the printed circuit board in the image here is an off-the-shelf unit that we can use because of its functionality and then show what it might look like when we are done with it. So when we make custom one we’re going to get rid of all the unnecessary components. We’re going to be able to shrink it down a little bit maybe it has extra features that we don’t need, and then it’s going to look like what we see here. The looks-like model that is a lot smaller and more refined and then the other aspect of it. In this case, we’re looking at a bracelet that has a… it’s called the Vibe Bead Jewelry (and this was a long time ago before the Apple Watch existed) where the concept was a way to notify you surreptitiously that you were getting a text message or a phone call. We wanted it to look like jewelry, so in order to do that, we took a 3d printed model and then we coated it with nickel so it would look like silver or stainless steel, that kind of thing, and it would look like a piece of jewelry that someone might want to wear. Then you had the Works-Like prototype to show how it would function, what it would feel like, things of that nature. So that was a product where we could… or rather a prototype… where we could very cost-effectively demonstrate the idea to somebody and let them know what our vision was. You might have a vision in your head, and you can make that jump to what it could be, but it’s very hard to convey that to other people. It’s really hard for them to see what’s in your mind or for them to make the jump from this really big thing… four inches or whatever… but you’re going to get it down to a really tiny thing that’s delicate and elegant.

Page 11: Set the Stage

As a prototype, you want to be prepared to show off everything that it can do discuss all the ideas of what the device could be but you don’t want to just hand it over and ship it to them or give them the prototype to play with. It’s just a tool to help you communicate. It’s not the product.

Page 12-13: Case Study – Milli Mova

I have a short little case study to get us through to prototyping. Here we are looking at a chair that someone would sit down, you push the lever down and it raises up on wheels and slides in.

Page 14: Concept Sketches

We start with the early concept sketches

Page 15: Detailed CAD

and then we move into 3d cad modeling. So that’s the next step is in the technical feasibility. We’re developing the detailed cad that allows us to understand every dimension. Think about things visually – do all the calculations of everything that might be involved. Maybe it’s forces, maybe it’s more dynamic, maybe we can do simulations in the software to understand things and optimize the design.

Page 16: 3D Printed Prototype

Then we can easily take that and build 3d printed prototypes. In this case, I built a 3d printed prototype of something but I knew that there were certain aspects that were going to fail… and the point was to identify those quickly as the low hanging fruit… and build those pieces and test them.

Page 17: Strength Testing

I can look through, I can put weight on it. I can calculate what force it should handle and then test it and see how well it does and figure out where it broke. That’s the 3d printed prototype.

Page 18: Design Iterations

Now I can move on, design it, refine it, build the prototype. Now I’ve tested it, and I go back, and I refine that design. Now I’m ready to go into Design for Manufacturing.

Page 19: Design for Manufacturing

In this case I built one out of a CNC machined plastic but eventually we’re going to get to injection molding because while you can cnc machine a few of them and it’s very expensive, once you get into injection molding, you pay for one expensive tool but then you can turn them out very quickly and inexpensively. The reason I went through all these different stages for testing was so that when I went and bought the tooling for the injection molded parts… It’s a very large investment and you want to know that when you’re done that your part will work really well and it’ll be reliable because it’s very expensive to change those tools and it’s extraordinarily expensive to rebuild them from scratch. There’s certain things you can do with the tool once you’ve built it to save some money and not rebuild it from scratch but you’d like to design it knowing that it’s going to work well.

Page 20: Manufacturing

Then you have manufacturing. Now that you’ve gone through and built your prototypes, and you can ramp up into Manufacturing and Sales. We need to be able to scale production, and if you’re using injection molded parts, you can scale up into the thousands very easily, tens of thousands. We might use hand assembly for now, but you could eventually get to… it depends on the type of product that you’re using or building… you might continue to build it by hand if it’s only in the thousands. If it goes into the tens of thousands, you might be talking about robotics and automation. These are ways that you would be able to reduce your unit costs and increase your margins as you scale up into higher volumes.

Page 21: Adding Value

You might be thinking, “I don’t I don’t want to get into manufacturing. How can I just sell my idea for 10 million dollars?”. Unfortunately, that might not be that simple. By themselves, ideas aren’t worth much. The reason that they’re not worth much is because you’re starting out on the left side [of this image] where you have all this risk ahead of you. As you reduce the risk… as you get over all of the different hurdles in the development process…

  • Figuring out what the device does
  • How the device will work
  • Figuring out how it can be manufactured
  • What your sales are going to be
  • What your distribution is
  • Ironing out the business plan
  • Making it ready for the market, even getting some customers

You’re driving out risk and that increases value in your product.

Page 22: Medical Devices

The product in the case study I showed is a healthcare-related product, but it’s not a regulated medical device. At Root3 Labs, we focus on defense and healthcare industries which can include medical devices that are regulated by the FDA. When we’re developing a medical device, it requires another dimension of documentation, risk analysis, and validation. All aspects of the design must be verified and validated and traced back to the product requirements. Every Design File and Calculation must be checked, reviewed, approved, and added into an ISO-certified version control system. Electrical devices have even greater regulatory hurdles, testing, and safety protocols to meet, and the requirements for Manufacturing and Quality Assurance are far more rigorous and expensive than if it wasn’t a regulated device.  Next, Dr. Steve Brooks is going to discuss some of the aspects and strategies for commercializing a regulated device.

en_USEnglish